

I've been meaning to write about short tutorials like this for a while now but couldn't thinking that no one's going to be interested in tech problems I face everyday now that the answer is just an LLM call away.
This changed with my recent interaction with Flavio on X where he suggested that I should write even if it's only for myself.
So here we go.
Why and Where was it needed?
Have you ever recorded a technical walkthrough, a bug reproduction, or a quick demo that you wanted to share over a meeting with a potential customer?
My day job requires doing this on a daily basis.
I've tried tools like awesome screenshot but I decided to build my own for a fairly less complex app knowing that my data will be safe in my own hands rather than with a third-party app for which I would have to manage an additional subscription 😪.
The idea (and initial UI) was plain and simple.
You record a video, throw it somewhere in the cloud, generate a shareable link, and send it to whoever you want.
That's how came into existence.
Snappit 📹 is a screen recording and video hosting application with a companion Chrome extension. You can record your screen, browser tab, or an individual window, upload the recording, play it back, and share it.
The first iteration only saved and delivered the file as is, which for web recordings is the standard .webm format by default.
So no hassle of video processing at all, In the later iterations, I wanted to change it and move to a more mature and universally accepted format for better UX.
Why bother 🤷♂️?
Ok, I know you're probably wondering why do you need to build and maintain your own video processing engine when you have a ton of third-party providers which do this for you by default like cloudinary, mux , imagekit etc. some cheaper than the others, all of them mostly running ffmpeg under the hood.
You can just pay them and move on.
And typically, If I was working on a customer's project and have short deadlines and real-world stakes, I probably would.
There are also open-source self-hosted alternatives like Snapotter and Openinary
But as a 10x dev (me 🙂) famously said:
I want to get my hands dirty, break things, find out what broke and how, try to fix them my way so I can learn how to build it from scratch if and when it's needed.

I wanted to understand what happens when multiple users start uploading massive video files and how will the server process it without bringing down the application.
Why FFmpeg?
If you've worked with images, you've probably used libraries like Sharp or ImageMagick.
Video processing is a different beast.
A video isn't just a file containing a sequence of images. It is a container that can hold multiple streams, including:
- Video streams.
- Audio streams.
- Subtitles.
- Metadata.
- Chapters.
Different devices and recording software produce different codecs, containers, resolutions, frame rates, and audio configurations.
Trying to handle all these variations yourself is an excellent way to spend your weekend debugging media compatibility issues.
FFmpeg solves this problem.
FFmpeg is an open-source multimedia framework that provides command-line tools and libraries for manipulating audio and video.
It basically is the backbone of modern file processing.
For Snappit, FFmpeg is responsible for converting uploaded recordings into a browser-friendly MP4 format.
Why MP4?
Because I want the resulting video to be playable across all media players without making every user worry about the codec used by the original recording software.
Understanding the architecture 🗺️
Before touching ✋ the code, let's understand the architecture of our app.
I use a monorepo (created using turborepo) with separate applications and shared packages.
The important pieces are:
- apps/web: Next.js application.
- apps/video-worker: Long-running video processing service.
- packages: Shared database, event, validation and storage functionality.
- extension: Chrome extension responsible for browser-based recording.
The web application runs on Vercel, whereas the video worker runs inside a Docker container on a VPS.
Why separate them?
Because web applications and video processing workloads have very different resource requirements.
A typical API request might take a few milliseconds which can be easily run on vercel’s serverless functions.
Video transcoding can take several minutes and consume substantial CPU and disk resources and generally require a dedicated long-running server.
Mixing these workloads would be an unnecessary architectural constraint.
The complete workflow
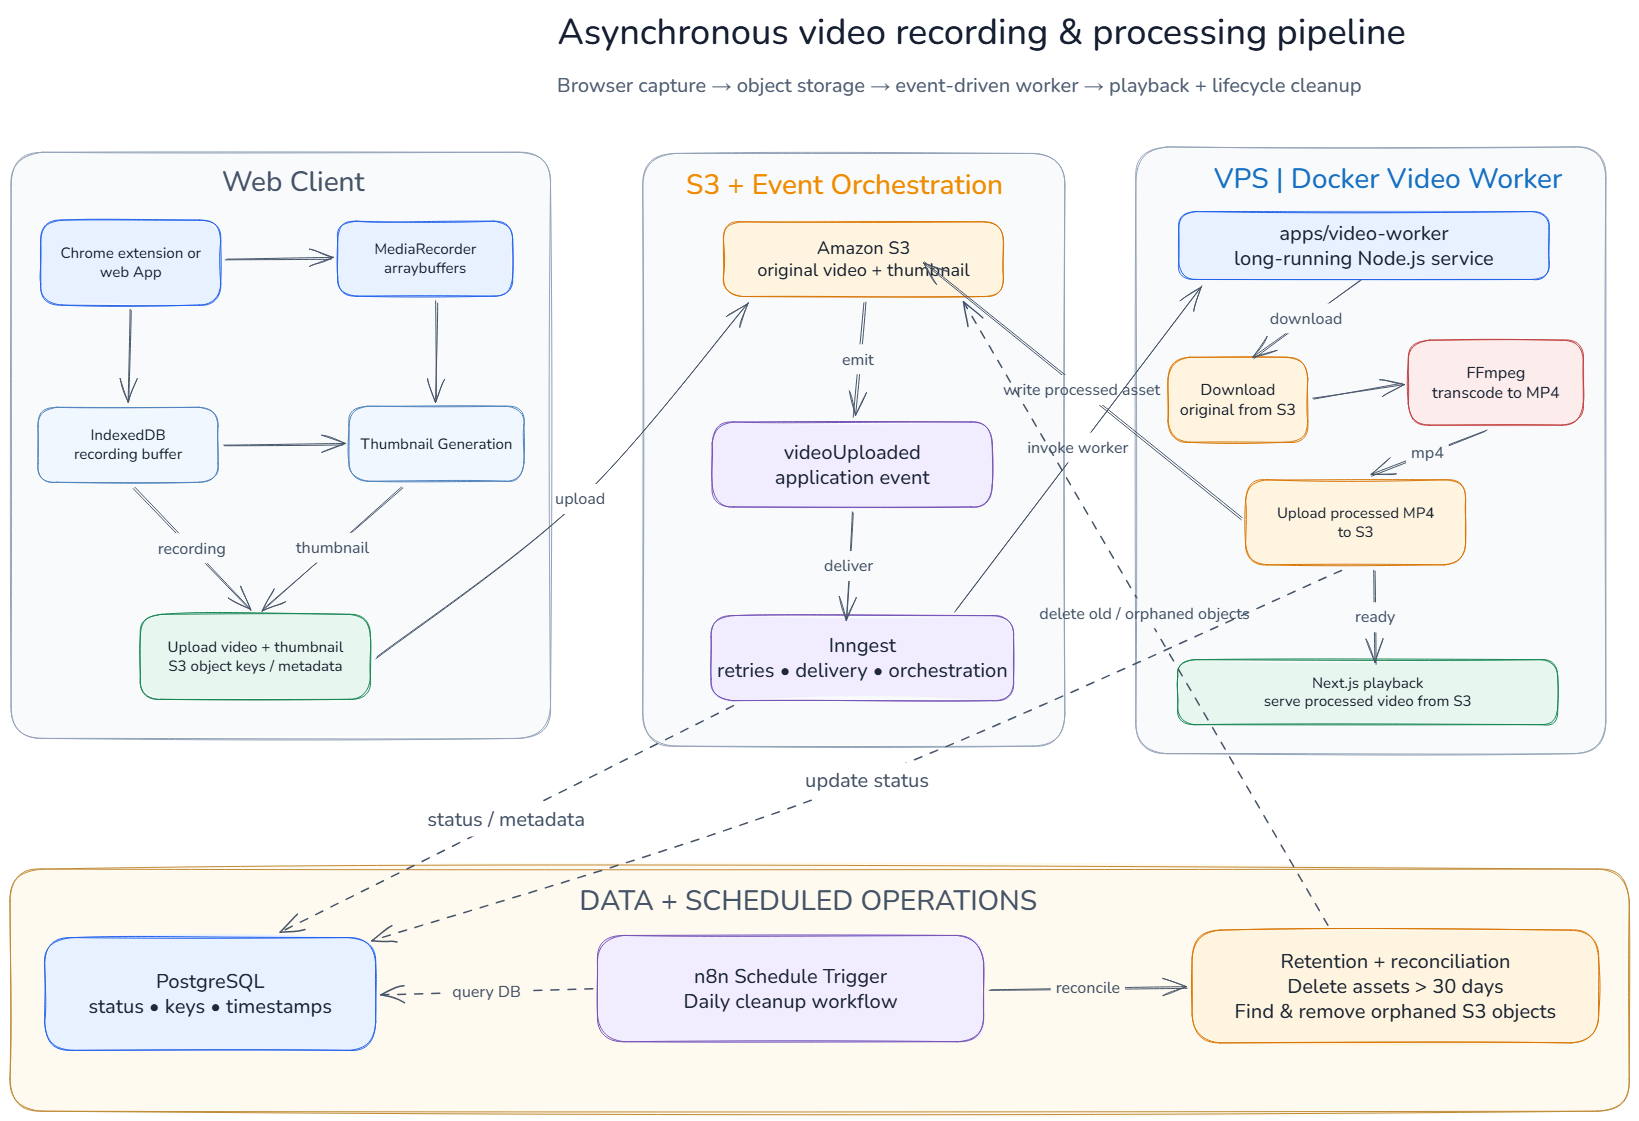
- The user records a video using the Chrome extension or web application.
- The recording is buffered using IndexedDB and ArrayBuffers.
- The thumbnail is generated using the initial frames of our recorded media stream
- The video and thumbnail are uploaded and stored in object storage.
- The application emits a videoUploaded event.
- Inngest delivers the event to the connected video worker.
- The worker downloads the original video from S3.
- FFmpeg transcodes it into MP4.
- The processed video is uploaded back to S3.
- PostgreSQL is updated with the processing status.
- The application can now serve the processed video for playback.
Notice something important?
The web application never has to sit around waiting for FFmpeg to finish.
It simply initiates the processing workflow and moves on.
That's the benefit of separating request handling from background workloads.
NOTE:
I also have a clean up Cron scheduled daily which deletes our video along with it’s metadata if they are more than a month old and also takes care of any ‘orphaned assets’ in our storage to keep them in sync with our Database. I use n8n schedule trigger for this but the code is pretty straight forward and you can implement this using any external service provider like Vercel cron, Inngest Scheduled Function Runs since we’re already using these services or just setup your own implementation using node-cron package on your server for maximum control.
If you don’t want to write code, you can even ask your agent to create scheduled tasks for this.
Now let's get to the interesting part. THE CODE
The Pipeline Implementation
Let's get our hands dirty.
All the code is available on the remote Repository.
You can either surf through it or follow the development steps in the readme to follow along, run locally and actually experience how the flow works.
Inside the repository, the FFmpeg implementation lives here:
apps/
  video-worker/
    src/
      config.ts
      worker.ts
      services.ts
      repository.ts
      functions/
        handlers.ts
        transcode-video-to-mp4.ts
      media/
        ffmpeg.ts
Let's break it down.
Before looking at the implementation, understand what FFmpeg actually does.
A typical transcoding pipeline looks like this:
 Input Video
     |
     v
  Demuxer
     |
     v
  Decoder
     |
     v
  Filter Graph
     |
     v
  Encoder
     |
     v
   Muxer
     |
     v
 Output Video
A demuxer extracts the individual streams from the input container.
A decoder converts compressed video and audio into data that can be processed.
A filter graph applies transformations such as resizing, cropping, or changing frame rates.
An encoder compresses the resulting streams.
Finally, a muxer packages the encoded streams into an output container.
One important distinction:
Transcoding is not the same as changing a file extension.
Changing video.mov to video.mp4 doesn't magically convert its underlying codecs.
You need to ensure that the actual streams are compatible with your target format.
Now let’s dive deep into different stages of our pipeline and see what each one does.
1. Understanding the FFmpeg command
Let's look at the actual implementation in apps/video-worker/src/media/ffmpeg.ts
The most important function is mp4Arguments().
Here's what it generates:
export function mp4Arguments(
  input: string,
  output: string
) {
  return [
    "-protocol_whitelist",
    "file,pipe",

    "-i",
    input,

    "-map",
    "0:v:0",

    "-map",
    "0:a:0?",

    "-map_metadata",
    "-1",

    "-sn",
    "-dn",

    "-vf",
    "pad=ceil(iw/2)*2:ceil(ih/2)*2",

    "-c:v",
    "libx264",

    "-preset",
    "veryfast",

    "-crf",
    "23",

    "-pix_fmt",
    "yuv420p",

    "-threads",
    "2",

    "-c:a",
    "aac",

    "-b:a",
    "128k",

    "-movflags",
    "+faststart",

    output
  ];
}
Let's understand why each option exists.
Input handling
-protocol_whitelist file,pipe
-i input.mp4
The input is read from a local file.
The protocol whitelist restricts which FFmpeg input protocols can be used. This is useful when processing untrusted uploaded media.
Stream selection
-map 0:v:0 -map 0:a:0?This is an interesting one.
0:v:0 means:
- 0: First input file.
- v: Video stream.
- 0: First video stream.
Similarly, 0:a:0? selects the first audio stream.
The question mark makes the audio mapping optional.
Why?
Because a screen recording might not contain audio. We don't want FFmpeg to fail simply because the input doesn't have an audio stream.
Metadata and unwanted streams
-map_metadata -1 -sn -dnThese options remove global metadata, subtitle streams, and data streams from the output.
This keeps the generated output focused on the actual video and audio.
Making dimensions compatible
-vf "pad=ceil(iw/2)*2:ceil(ih/2)*2"This is one of those tiny implementation details that saves you from annoying encoder errors.
H.264 with the selected pixel format commonly expects even dimensions.
If the input has an odd width or height, FFmpeg pads it to the next even dimension.
For example:
Input: 1921 x 1081

Output: 1922 x 1082
We aren't resizing the video. We're adding padding.
Video encoding
-c:v libx264 -preset veryfast -crf 23 -pix_fmt yuv420p -threads 2Here's what these options do:
- libx264: H.264 video encoder.
- veryfast: Encoding-speed versus compression-efficiency trade-off.
- crf 23: Constant Rate Factor quality setting.
- yuv420p: Widely compatible pixel format.
- threads 2: Limits encoder thread usage.
CRF is worth understanding.
A lower CRF generally means better quality and larger output files. A higher CRF means more compression and potentially more visible quality loss.
The useful thing about CRF is that it targets visual quality rather than a fixed output bitrate.
Audio encoding
-c:a aac -b:a 128kWe encode audio using AAC at 128 kbps.
This gives us a widely supported audio format inside the MP4 container.
Fast-start playback
-movflags +faststartThis is another important option.
MP4 files contain metadata describing their streams and media layout.
The faststart option moves the MP4 metadata (the moov atom) towards the beginning of the file.
This allows playback to begin without requiring the player to download the entire file first.
For a video hosting application, this is particularly useful.
2. Executing FFmpeg safely from Node.js
We don't want to construct a shell command by concatenating user-provided strings.
Instead, Snappit uses execa to execute FFmpeg with an argument array.
export async function runFfmpeg(
  args: string[],
  config: MediaConfig,
  execute: typeof execa = execa
) {
  try {
    await execute(
      config.FFMPEG_PATH,
      [
        "-nostdin",
        "-hide_banner",
        "-loglevel",
        "error",
        "-y",
        ...args
      ],
      {
        timeout: config.FFMPEG_TIMEOUT_MS,
        forceKillAfterDelay: 5000,
        maxBuffer: 1024 * 1024,
        stdout: "ignore"
      }
    );
  } catch (error) {
    // Handle processing errors
  }
}
A few things worth noting:
- We execute FFmpeg directly instead of passing a constructed command through a shell.
- -nostdin prevents FFmpeg from waiting for interactive input.
- -hide_banner removes unnecessary startup information.
- -loglevel error keeps logs manageable.
- -y allows output files to be overwritten.
- A timeout prevents a processing operation from running indefinitely.
- forceKillAfterDelay gives the process a short grace period to terminate.
There's also an important distinction in error handling.
Invalid or corrupted media is treated as a non-retriable error.
Infrastructure failures, such as timeouts or disk exhaustion, remain retriable.
Why?
Retrying a corrupted file twice isn't going to magically repair it.
But a temporary infrastructure problem might resolve itself on the next attempt.
This distinction becomes very important when you start processing videos asynchronously.
3. Managing temporary files
One of the easiest ways to create a production problem with FFmpeg is to forget about temporary files.
Imagine 100 users uploading videos simultaneously.
If every job writes to the same directory or uses predictable filenames, you can end up with file collisions, accidental overwrites, or one job deleting another job's output.
Snappit uses an isolated temporary directory for each processing attempt.
export async function withMediaDirectory<T>(
  work: (directory: string) => Promise<T>,
  parent = tmpdir()
) {
  await mkdir(parent, { recursive: true });

  const directory = await mkdtemp(
    join(parent, "snappit-media-")
  );

  try {
    return await work(directory);
  } finally {
    await rm(directory, {
      recursive: true,
      force: true
    });
  }
}
This is a very simple but effective pattern.
Every processing attempt gets its own directory:
/tmp/snappit-media-a81x/
    input
    output.mp4

/tmp/snappit-media-b92y/
    input
    output.mp4
When processing finishes, the directory is removed.
The finally block ensures clean-up happens even when the processing operation throws an error.
And here's an important design decision: temporary files belong to an individual processing step attempt, not to the entire durable workflow.
This matters when a background job retries. Each attempt should start with a clean workspace.
Building the background worker
So far, we've seen how to convert a video.
But who actually executes this conversion?
We don't want our Next.js API route to start an FFmpeg process and wait for it to finish.
Instead, we use a dedicated worker connected to Inngest.
Think of Inngest as the event-driven orchestration layer.
The web application emits an event, and the worker consumes it.
Step 1: Registering the processing function
Take a look at:
apps/video-worker/src/functions/transcode-video-to-mp4.ts
The important part:
  return inngest.createFunction(
    {
      id: "transcode-video-to-mp4",
      name: "Transcode video to MP4",
      triggers: [videoUploaded],
      concurrency: { limit: 2 },
      retries: 2,
      idempotency: "event.data.videoId",
      singleton: { key: "event.data.videoId", mode: "skip" },
      onFailure: handlers.failure,
    },
    handlers.process,
  );
}
Let's understand the configuration.
Triggers
triggers: [videoUploaded]
The function executes when a video upload event is received.
Concurrency
concurrency: { limit: 2 }
This limits the function's concurrent execution to two.
Remember, video processing can be CPU-intensive. We don't want to start 50 FFmpeg processes on a machine with four CPU cores.
Retries
retries: 2
The workflow can retry failed processing operations.
Idempotency
idempotency: "event.data.videoId"
This prevents the same video from being independently processed multiple times for the same idempotency key.
Singleton
singleton: { key: "event.data.videoId", mode: "skip" }
This adds another layer of protection against concurrent processing of the same video.
These mechanisms solve different problems, and that's worth remembering when designing background jobs.
Step 2: Claiming a video
Before starting FFmpeg, we need to establish ownership of the processing job.
Otherwise, imagine two worker executions attempting to process the same video.
Both could download the original file, encode it, upload separate outputs, and race to update the database.
Not ideal.
Snappit handles this in repository.ts.
The claim() method uses a PostgreSQL transaction and row-level locking:
const [existing] = await tx
  .select()
  .from(videos)
  .where(eq(videos.id, videoId))
  .for("update");
The FOR UPDATE clause locks the selected row for the duration of the transaction.
The repository then checks:
- Does the video exist?
- Has the upload been finalized?
- Is another processing run already handling it?
- Has the video already been processed?
If everything is valid, the video is marked as processing.
This gives us database-level coordination in addition to the orchestration-level concurrency controls.
Step 3: Processing the video
The handler executes three major steps:
  mark-processing
      |
      v
transcode-and-upload-mp4
      |
      v
  mark-ready
The actual rendering operation is delegated to the services layer.
Here's the interesting part.
The worker doesn't load the entire video into a JavaScript Buffer.
It downloads the S3 object as a stream and writes it to disk.
await pipeline(
  body,
  limit,
  createWriteStream(input),
  { signal }
);
The Transform stream counts the number of bytes received and rejects files exceeding the configured maximum.
The current implementation has a 500 MiB video limit.
Once the download is complete:
await encode(input, output, config);FFmpeg processes the local file.
After processing, the worker obtains the output size and uploads the result using the AWS SDK's multipart upload functionality.
const upload = new Upload({
  client: storage.client,

  params: {
    Bucket: storage.bucket,
    Key: getVideoObjectKey(processedKey),
    ContentType: PROCESSED_VIDEO_CONTENT_TYPE,
    ContentLength: size,
    Body: outputStream
  },

  queueSize: 2,
  partSize: 8 * 1024 * 1024,
  leavePartsOnError: false
});

await upload.done();
Notice that the output is also streamed from disk rather than read completely into memory.
This is important.
We are keeping the memory footprint relatively predictable even when processing larger recordings.
Step 4: Updating the processing status
After a successful upload, the worker updates PostgreSQL DB.
The status transitions are essentially:
uploading
    |
    v
processing
    |
    v
  ready
If all retries fail:
processing
    |
    v
  failed
The repository also checks the processing run ID before updating the status.
Why?
Because a late failure from an older processing attempt should never overwrite the successful result of a newer attempt.
This is a small implementation detail with a big impact on correctness.
Running the worker using Docker
Now we have a processing pipeline.
But where does FFmpeg actually run?
Inside a Docker container.
The worker has its own Dockerfile:
FROM node:22-bookworm-slim AS build

ENV PNPM_HOME=/pnpm
ENV PATH=$PNPM_HOME:$PATH

RUN corepack enable \
    && corepack prepare pnpm@10.28.0 --activate

WORKDIR /repo

COPY . .

RUN pnpm install --frozen-lockfile \
    --filter @snappit/video-worker...

RUN pnpm --filter @snappit/video-worker build

RUN pnpm --filter @snappit/video-worker \
    deploy --prod /output

FROM node:22-bookworm-slim AS runtime

RUN apt-get update \
    && apt-get install -y --no-install-recommends \
       ffmpeg ca-certificates \
    && rm -rf /var/lib/apt/lists/* \
    && mkdir -p /var/tmp/snappit-media \
    && chown node:node /var/tmp/snappit-media

ENV NODE_ENV=production
ENV FFMPEG_PATH=/usr/bin/ffmpeg
ENV MEDIA_TEMP_DIRECTORY=/var/tmp/snappit-media

WORKDIR /app

COPY --from=build --chown=node:node /output ./

USER node

CMD ["node", "dist/worker.js"]
A few architectural decisions here are worth appreciating.
Multi-stage builds
The build environment and runtime environment are separated.
We don't need all the development dependencies in the production container.
FFmpeg installation
FFmpeg is installed in the runtime image, so the worker doesn't depend on FFmpeg being installed on the host machine.
Non-root execution
USER node
The worker doesn't need to run as root.
This reduces the impact of a potential compromise.
This is just a best practice I do in every custom image I make
Dedicated temporary directory
ENV MEDIA_TEMP_DIRECTORY=/var/tmp/snappit-mediaThe worker has a predictable location for temporary media files.
To build the worker image from the repository root:
docker build \
  -f apps/video-worker/Dockerfile \
  -t snappit-video-worker .
Then run it with the worker's environment configuration:
docker run -d \
  --name snappit-video-worker \
  --restart unless-stopped \
  --env-file ./worker.env \
  -p 8080:8080 \
  snappit-video-worker
The worker exposes a /ready health endpoint.
It reports readiness only after establishing its Inngest connection.
One important distinction: this is not a standalone HTTP video-processing API. The worker establishes an outbound connection to Inngest and waits for events.
The web application and the worker therefore don't need to communicate through a publicly exposed FFmpeg endpoint.
How well does this scale 📈
Now for the question that matters when moving from a personal project to something people actually use.
Does this architecture scale?
The short answer: Yes, horizontally, but with some important resource constraints.
Let's look at the bottlenecks.
CPU
FFmpeg transcoding is computationally expensive.
In the current implementation, we use:
-preset veryfast -threads 2
The worker also has a configurable concurrency setting, defaulting to one worker connection slot.
The processing function itself has a concurrency limit of two.
These are two different concurrency controls, so the effective throughput depends on both.
You can run multiple worker instances on separate machines and increase aggregate processing capacity.
However, simply increasing concurrency on a small VPS is a good way to discover what CPU throttling feels like.
Memory
This is where the implementation makes some sensible choices.
The input is downloaded using streams.
The output is uploaded using streams.
The video isn't loaded entirely into memory as one giant Buffer.
That doesn't mean FFmpeg uses no memory. Decoding, encoding, filter buffers, and frame processing all consume memory.
But the Node.js application avoids an unnecessary additional memory burden.
Storage
Temporary files are stored on local disk.
This is efficient because FFmpeg works with local files rather than repeatedly fetching media from remote storage.
However, local disk becomes a scaling constraint.
If several large jobs execute simultaneously, they can consume substantial disk space.
The temporary-directory cleanup helps, but production deployments still need adequate disk capacity and monitoring.
Database
PostgreSQL stores metadata and processing state.
It doesn't store the actual video binaries.
That's a good separation.
Your database should be responsible for knowing which video belongs to whom, its processing status, and where its files live.
Object storage should handle the actual media.
Queue and worker scaling
This is arguably the strongest part of the architecture.
The web application and processing workers scale independently.
For example:
             Next.js Application
                     |
                     v
              Inngest Events
                     |
          +----------+----------+
          |          |          |
          v          v          v
    Worker 1   Worker 2   Worker 3
          |          |          |
          v          v          v
       FFmpeg     FFmpeg     FFmpeg
          |          |          |
          +----------+----------+
                     |
                     v
                  S3 Storage
If processing demand increases, you can add worker instances without scaling your Next.js application.
That's a much more flexible architecture than putting FFmpeg execution inside API routes.
One caveat: the current implementation is a good foundation for moderate workloads, not proof of unlimited scale. The repository doesn't provide production throughput benchmarks, and actual capacity will depend on video duration, resolution, codec, CPU, disk performance, and worker configuration.
What I did right
There are several engineering decisions I particularly like.
1. Separation of responsibilities
The web application handles users, authentication, recording, and uploads.
The worker handles CPU-intensive media processing.
The storage layer handles media persistence.
The database handles application state.
Each component has a reasonably clear responsibility.
2. Streaming instead of loading everything into memory
This is important for large media files.
Both input downloads and output uploads use streams.
3. Idempotent processing
Duplicate events and concurrent attempts are handled deliberately.
This is essential when building reliable asynchronous systems.
4. Temporary file isolation
Each processing attempt gets its own directory.
No shared filenames, no accidental interference between jobs.
5. Configurable processing
FFmpeg paths, timeouts, temporary directories, concurrency, and database connection settings are configurable.
This makes deployment and tuning easier.
6. Docker-based deployment
FFmpeg dependencies are bundled into the worker environment.
You don't have to manually maintain a matching FFmpeg installation on every machine.
What I would improve next
No architecture is perfect, and there are a few areas I'd improve as the application grows.
1. Add a proper processing priority system
Not all videos are equally important.
A user waiting for a 20-second recording shouldn't necessarily wait behind a 90-minute recording.
I'd introduce different processing queues or priorities.
For example:
High Priority: Short recordings User-requested conversions Normal Priority: Regular uploads Low Priority: Thumbnail generation Background optimisations
This improves perceived latency without necessarily increasing infrastructure costs.
2. Introduce adaptive concurrency
Right now, concurrency is configurable, which is good.
But a fixed concurrency limit doesn't necessarily account for the size of incoming videos.
A 20 MB recording and a 450 MB recording can have drastically different processing requirements.
I'd eventually consider resource-aware scheduling based on:
- Available CPU.
- Available RAM.
- Available disk space.
- Video duration.
- Resolution.
- Estimated processing complexity.
The goal would be to avoid overloading the machine while maximising throughput.
3. Hardware acceleration
The current implementation uses:
-c:v libx264
This is CPU-based encoding.
For larger workloads, I'd explore hardware encoders such as:
- NVIDIA NVENC.
- Intel Quick Sync Video.
- AMD AMF.
For example, an NVIDIA-enabled FFmpeg build can use:
-c:v h264_nvenc
Hardware acceleration can significantly improve throughput for suitable workloads.
However, it isn't automatically faster in every situation. I’ll benchmark before committing.
4. Generate thumbnails and multiple resolutions
Our App is good enough.
But a proper video hosting platform eventually needs more.
I'd add:
- Automatic thumbnail generation
- Multiple resolution presets.
- Preview clips.
- Web-optimised playback variants.
Currently, we already generate the thumbnail right there in the browser after our screen recording ends and before upload begins using the Canvas Web API.
I’d want to this step to the server side as well.
FFmpeg is very capable of clipping frames from our video stream and generating thumbnail from the initial frames.
For example:
ffmpeg -i input.mp4 \
  -ss 00:00:05 \
  -frames:v 1 \
  -vf "scale=640:-1" \
  thumbnail.jpg
This extracts a frame five seconds into the video and scales it to 640 pixels wide.
I'd also consider generating 360p, 720p, and 1080p variants for adaptive playback.
5. Move towards HLS
MP4 is great for straightforward playback.
But if I eventually want adaptive bitrate streaming, I'd consider HLS.
Instead of serving one large video file, we can generate a playlist and multiple smaller segments.
ffmpeg -i input.mp4 \
  -c:v libx264 \
  -c:a aac \
  -hls_time 6 \
  -hls_playlist_type vod \
  -hls_segment_filename "segment_%03d.ts" \
  output.m3u8
This is a simplified example, not a complete multi-bitrate HLS pipeline.
The bigger idea is that the player can choose an appropriate quality based on network conditions.
That's useful when users have different internet speeds or watch recordings on mobile networks.
6. Better observability
You can’t improve what you can’t measure
Although our example project is for learning, if it ever moves to production or a Saas model,
I'd want metrics for:
- Average processing time.
- Processing time by video duration and resolution.
- Queue waiting time.
- Failure rate.
- Retry count.
- CPU and memory usage.
- Disk consumption.
- Storage upload latency.
I'd also introduce structured logs using services like sentry, posthog, grafana loki etc. with a consistent video ID and processing run ID that I can later run aggregations, visualization charts and make efficient business decisions depending on user actions and other analytics data.
Knowing that a job failed is useful.
Knowing why 15% of 4K recordings fail after 12 minutes is much more useful.
So, should you build your own cloudinary?
Let's look at the pros and cons of building your own video processing infrastructure:
There is also an important economic consideration.
Self-hosting doesn't automatically mean cheaper.
If you have a handful of users uploading occasional recordings, a small VPS and object storage can be perfectly reasonable.
If you suddenly have thousands of users uploading hours of 4K footage, your compute and storage bills can become substantial.
At that point, you need to compare the total cost of ownership against managed video-processing services.
The real advantage of self-hosting is control, flexibility, and the ability to build a processing pipeline around your exact requirements.
Final thoughts
Building snappit taught me something.
An app as easy as this can go to unprecedented complexity if you let it be.
Therefore it is necessary to have the vision of where you want to take a project.
You need to be clear about which features deserve to be released in which iteration, how to make the decision between offloading to a third-party provider or ship and maintain your own from scratch.
As for the video worker, I can keep evolving it into a more general-purpose media processing service, independent of any single application.
The idea would be to expose a unified API where a client can upload an image or video, and once processing is complete, we notify them through a webhook. They then get a URL that can accept different parameters to retrieve the media in different formats, generate trimmed versions of videos, create multiple thumbnails, and perform other transformations, all through a single, consistent interface.
Wouldn’t that be neat huh!
But honestly, that would just be me reinventing the wheel.
So Back to the original question:
Should you build your own video processing pipeline?

Just use one of the paid or open-source solutions mentioned in the article and move on.
That’s it for this one folks.
Until Next Time,
Happy Debugging Coding 👋